Before you choose
Compare the pattern and the endpoint separately
These free-hand hairstyle references focus on visible braid patterns: fine fans, curved rows, side swirls and the way the back is gathered. A close view can explain the parting direction while hiding the final length. The photographs alone cannot confirm whether hair has been added or which installation method was used. If a no-added-hair result is essential to your brief, confirm that requirement directly before using the pattern as inspiration.
The hairstyle gallery
18 free-hand hairstyles ideas to compare
Compare the visible length, shape, texture, and finish before choosing a salon reference.
Idea 01
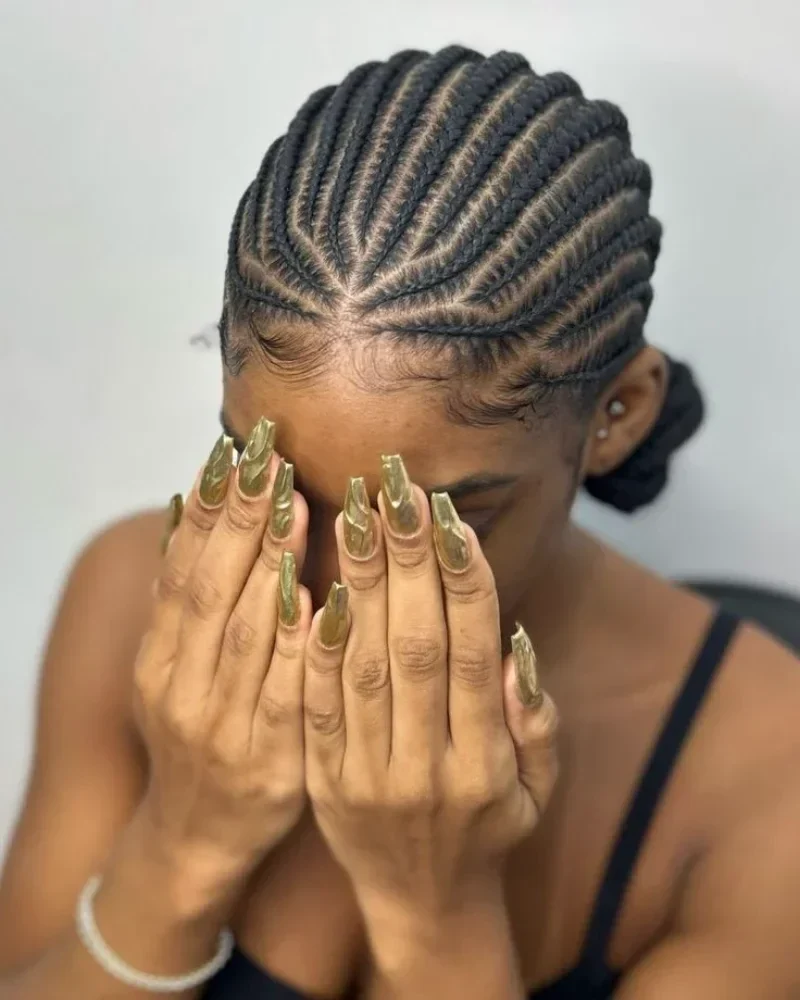
Fine Braids Fanning From the Front
Fine dark braids fan outward from a point near the front. Their curved directions spread across the upper head before continuing toward a small low gathering behind.
- Shape
- Front fan pattern
- Detail
- Low gathered back
The open partings make the change in direction easy to see. The close upper silhouette remains the main feature, with no large ornament covering the pattern.
Wearability note: Save this angle if the fan’s starting point is what you like. A rear view will help describe the low finish separately, since the upper pattern is much clearer here than the exact back gathering.
Idea 02
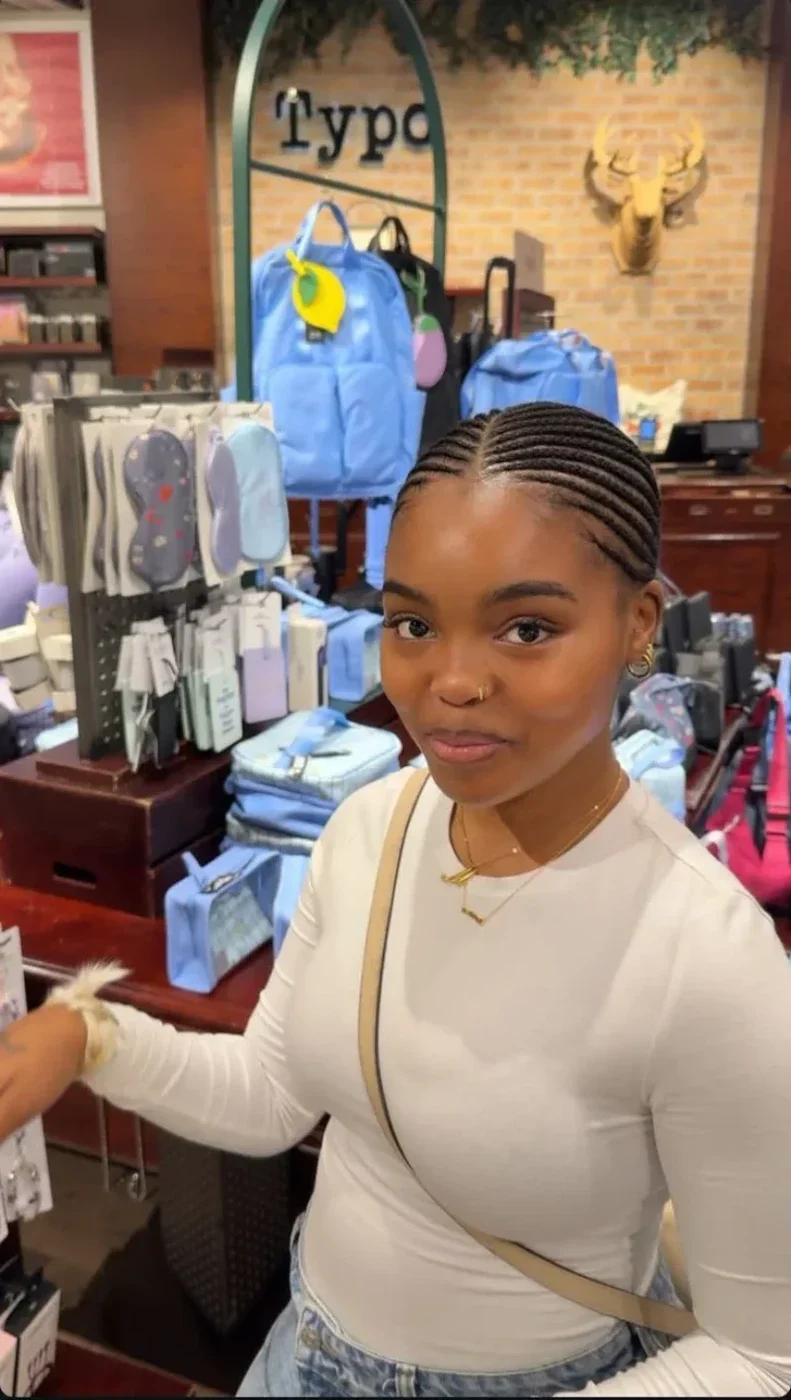
Center Part With Even Side Rows
A clear center part divides even dark braid rows across both sides. The front view shows a balanced upper pattern with the hair kept close to the head around the temples.
- Shape
- Clear center part
- Detail
- Even side rows
The rows angle backward instead of hanging loose beside the face. The full lower finish is not visible, making the upper parting and side direction the useful details in this photograph.
Wearability note: Choose this as a front-pattern reference rather than a complete rear design. If you want a bun, short ends or hanging length behind it, bring a separate back view to explain that choice.
Idea 03
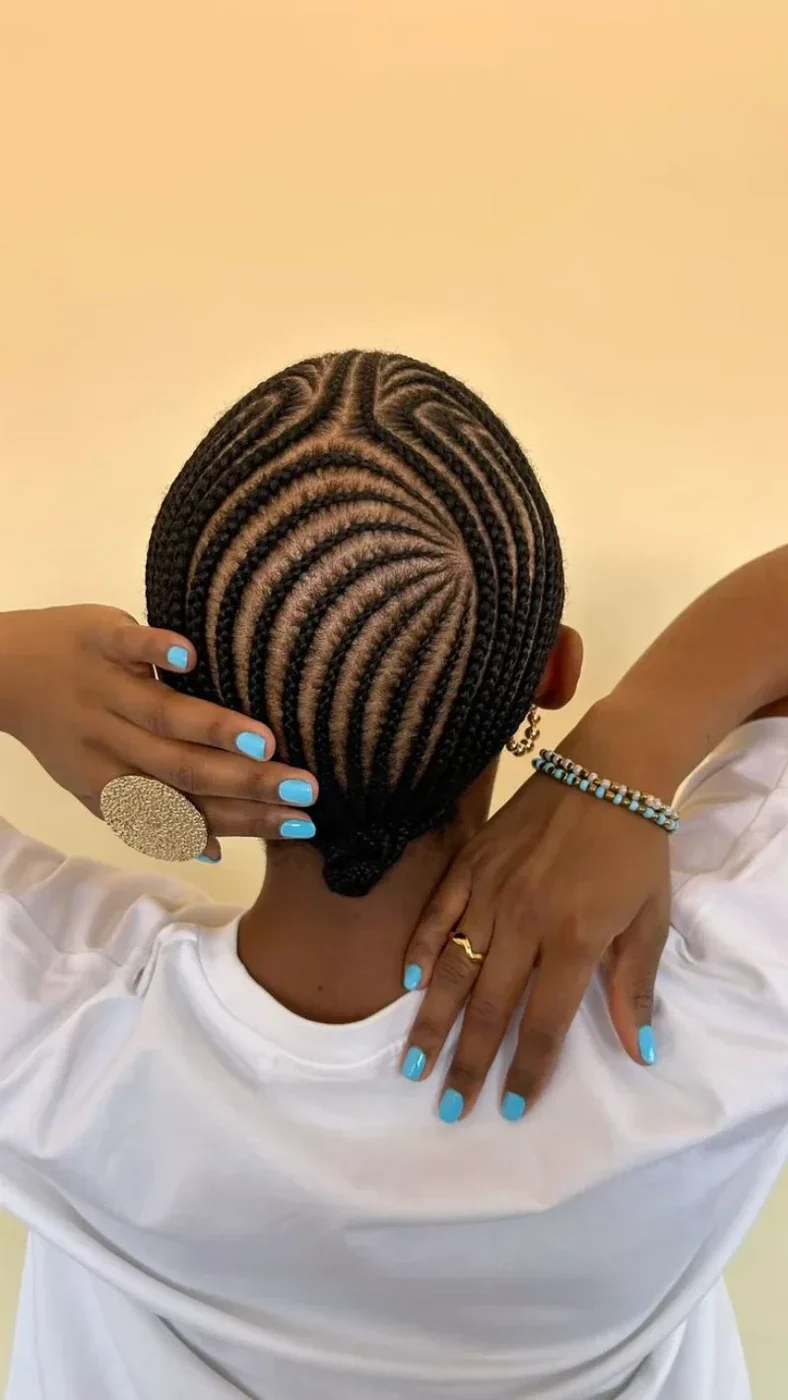
Nested Curves Above a Small Nape Knot
Nested curved rows form a broad pattern above a small nape knot. The rear view reveals how the braids change direction across the head while the lower finish stays compact.
- Shape
- Nested curved rows
- Detail
- Small nape knot
The largest curved area sits near the center. Smaller surrounding rows follow its outline, creating a repeated shape without adding loose length down the back.
Wearability note: Choose this if the patterned rear is more important than a long hanging finish. Point out the size of the central curve, because changing that proportion would alter the appearance even with similarly fine braids.
Choose your direction
Choose the pattern
Compare a front fan, small side swirl and larger nested curves.
Choose the endpoint
Look at tucked nape finishes, short loose ends and raised knots.
Confirm the method
Discuss starting length and any no-added-hair requirement directly.
Idea 04
Fine Swept Rows With Short Loose Ends
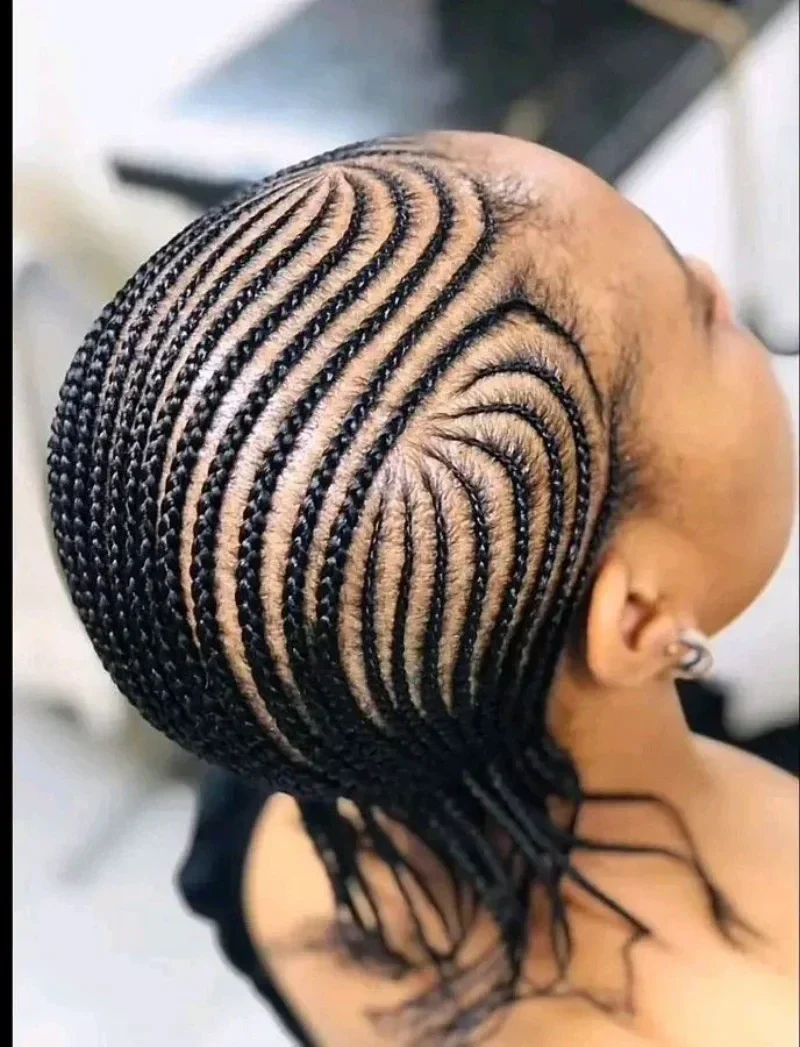
Fine dark rows sweep across the side and continue toward short loose ends near the neck. A smaller curved area changes the direction above the ear.
- Shape
- Fine swept rows
- Detail
- Short lower ends
The braids remain close to the head through most of the visible side. The lower ends create a different finish from the fully tucked nape knots elsewhere in the gallery.
Wearability note: Use this photograph to compare a loose short endpoint with a contained back. The side view is particularly helpful for describing how the smaller curve meets the broader rows above it.
Idea 05
Curved Braids Into Two Upper Buns
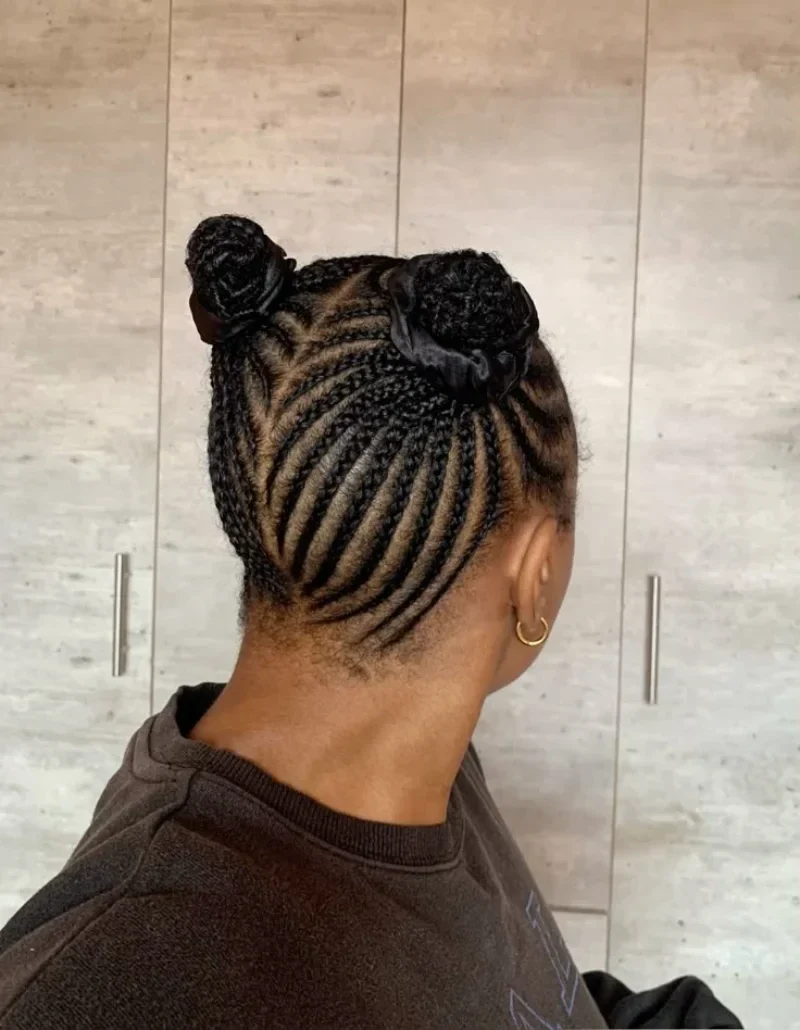
Curved dark rows gather upward into two buns. The exposed lower pattern follows a different direction from a nape gathering, emphasizing the upward movement from the back of the head.
- Shape
- Curved lower rows
- Detail
- Paired upper buns
The paired buns add two rounded focal points above the close braided surface. The nape remains clear, keeping the lower outline compact beneath the raised shapes.
Wearability note: Choose this for the paired gathering as well as the braid pattern. Compare the bun size and spacing independently, since those choices change the upper silhouette without requiring the same changes in the lower rows.
Idea 06
Fine S-Curved Rows Across the Top
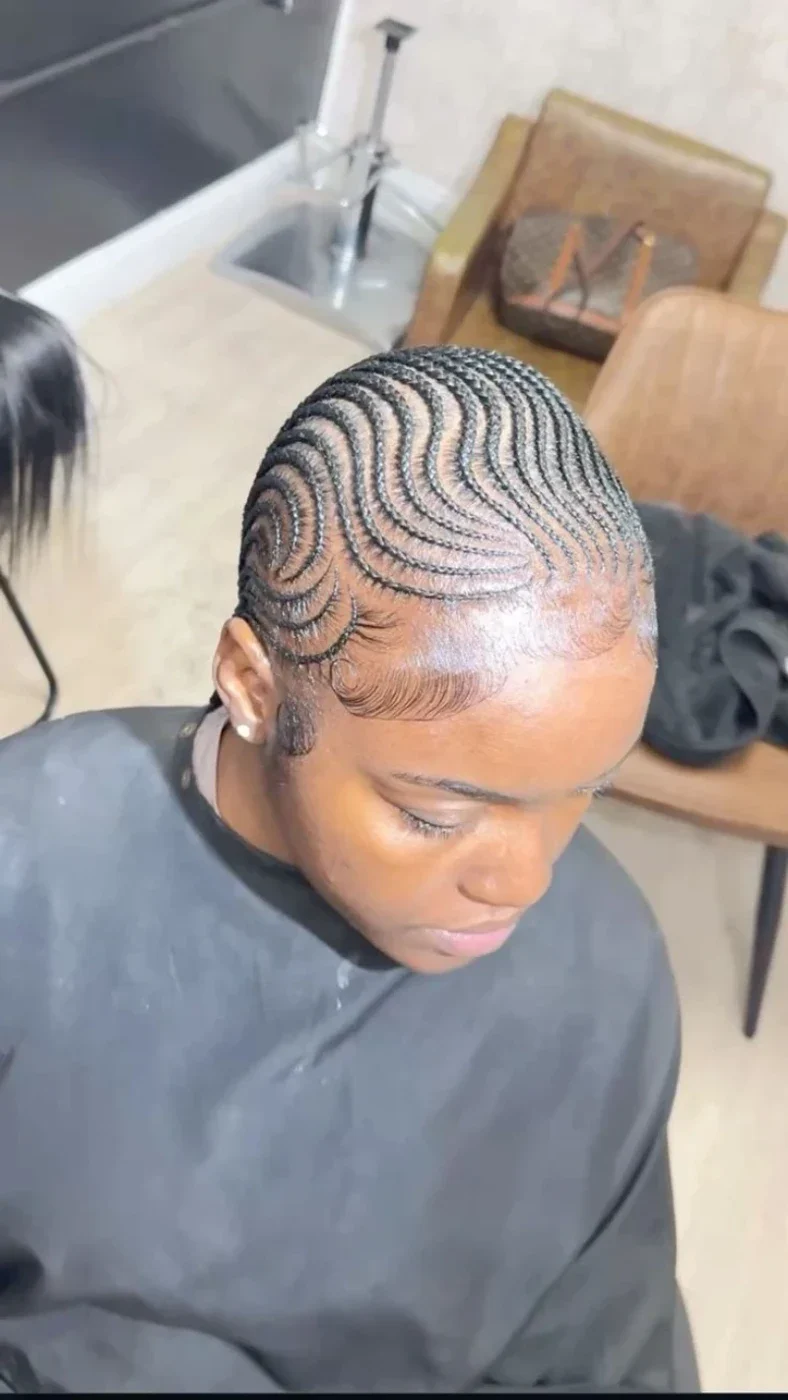
Fine dark braids form repeated S-shaped curves across the top and side. The upper view makes their changing direction visible without a large gathering or accessory competing for attention.
- Shape
- Fine S curves
- Detail
- Close upper outline
The rows sweep around a smaller side curve near the temple. Their fine scale creates many narrow partings, giving the surface more repeated detail than the broader-row references.
Wearability note: Choose this angle for the pattern scale and curve direction. The back endpoint is less clear, so pair it with a separate rear reference if a particular knot or hanging finish is part of your preference.
Idea 07
Rear Curve Pattern With a Tucked Nape
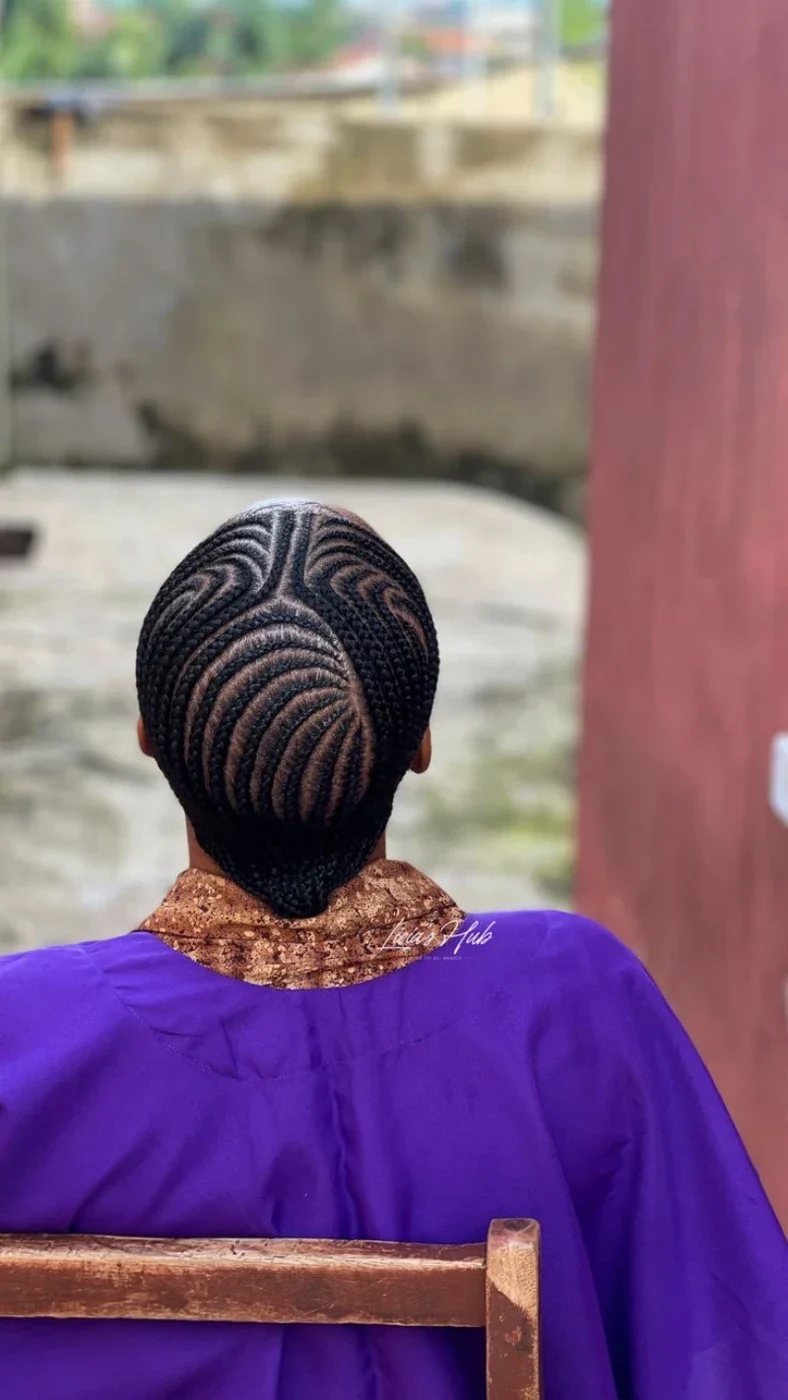
Large curved sections organize the rear braid pattern above a tucked nape finish. The view shows the full back outline, including the way the lower rows meet the compact gathering.
- Shape
- Large rear curves
- Detail
- Tucked nape finish
The central curved area is broader than the small turns near the upper sides. That variation gives the pattern a focal point rather than making every row follow one uniform direction.
Wearability note: Choose this rear view if a contained lower edge matters to you. Point out the main central curve as well as the tucked finish, because either could be changed independently in another arrangement.
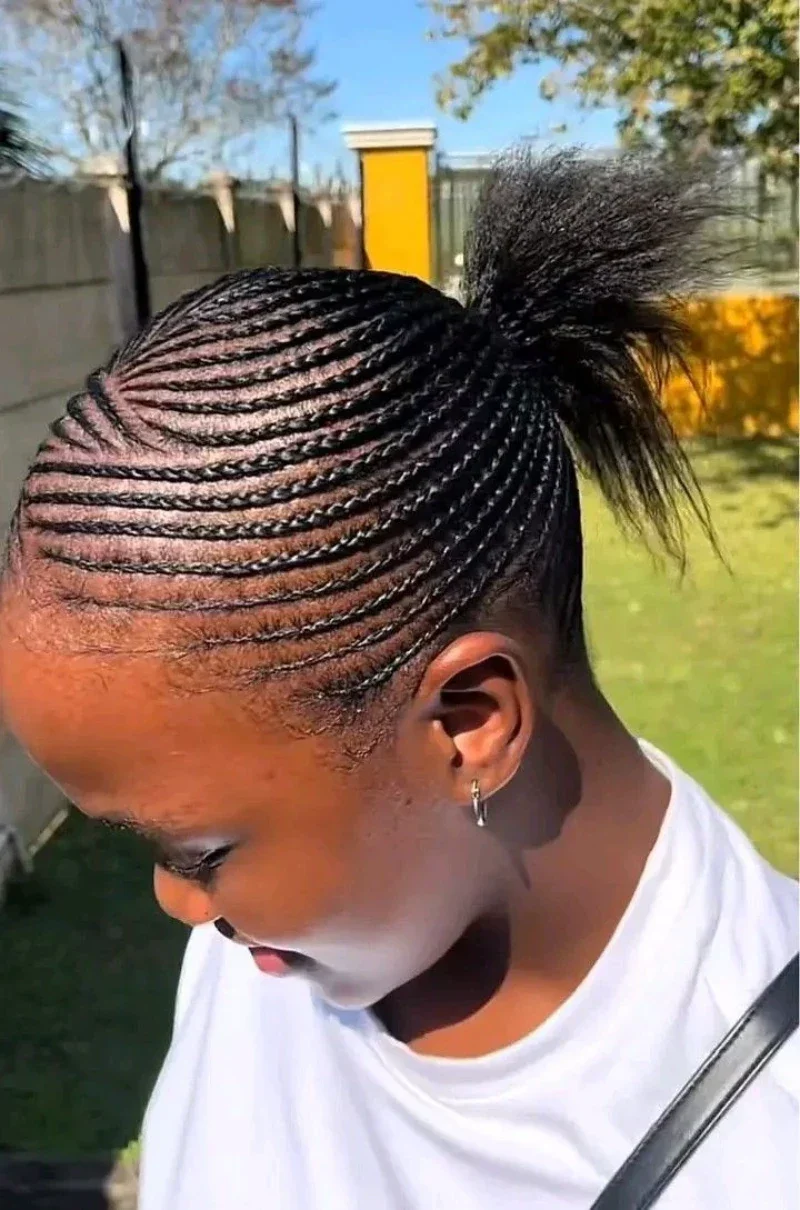
Idea 08
Swept Rows Into a Small Raised Tail
Fine rows sweep backward toward a small raised tail. The loose ends extend outward behind the head, providing a visible textured finish above the closer braided surface.
- Shape
- Swept fine rows
- Detail
- Small raised tail
The side profile exposes most of the ear. The rows rise gently toward the back rather than converging at a low point near the neck.
Wearability note: Choose this if you prefer a little loose texture to a fully tucked endpoint. The tail’s height is important to the profile, so describe it separately from the fine scale of the braids along the side.
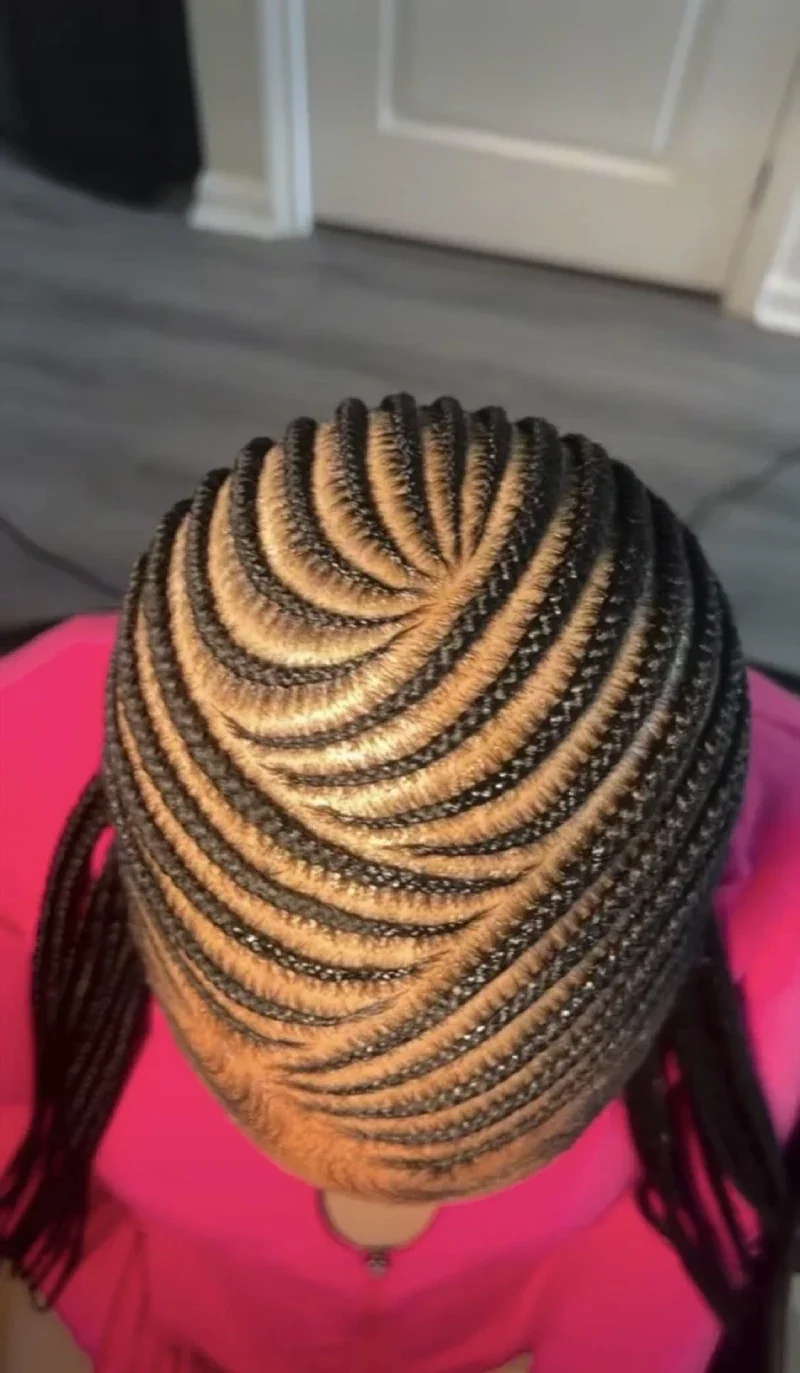
Idea 09
Curved Rows Following an Off-Center Line
Dark curved rows follow an off-center upper line. The close overhead view highlights the spacing between braids and the way each line bends toward the side.
- Shape
- Off-center division
- Detail
- Repeated curved rows
A small amount of lower hair is visible at the edges, but the full rear endpoint is outside the main view. The useful feature is the asymmetry across the top.
Wearability note: Choose this for its pattern direction rather than assuming a particular back finish. A centered layout would create a different balance, even if the braid thickness and overall number of rows stayed similar.
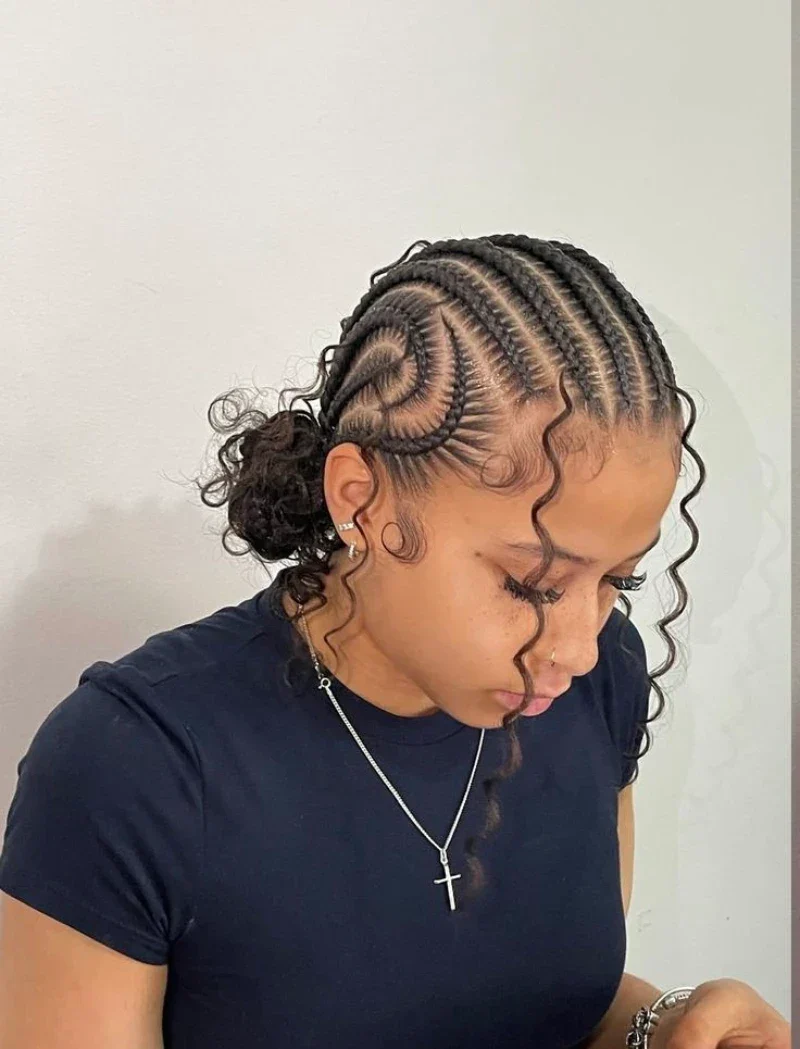
Idea 10
Side Spiral With a Low Curly Gathering
A small spiral shapes the side braid pattern above a low curly gathering. Fine curled pieces remain beside the face, giving the close braided surface a softer front edge.
- Shape
- Side spiral pattern
- Detail
- Low curly gathering
The upper rows sweep backward around the spiral rather than all following a straight line. Loose curls at the back add a rounded texture near the nape.
Wearability note: Choose this if you want both a defined side pattern and some loose curl detail. Compare how many front pieces you prefer, since they can alter face coverage without changing the main braided direction.
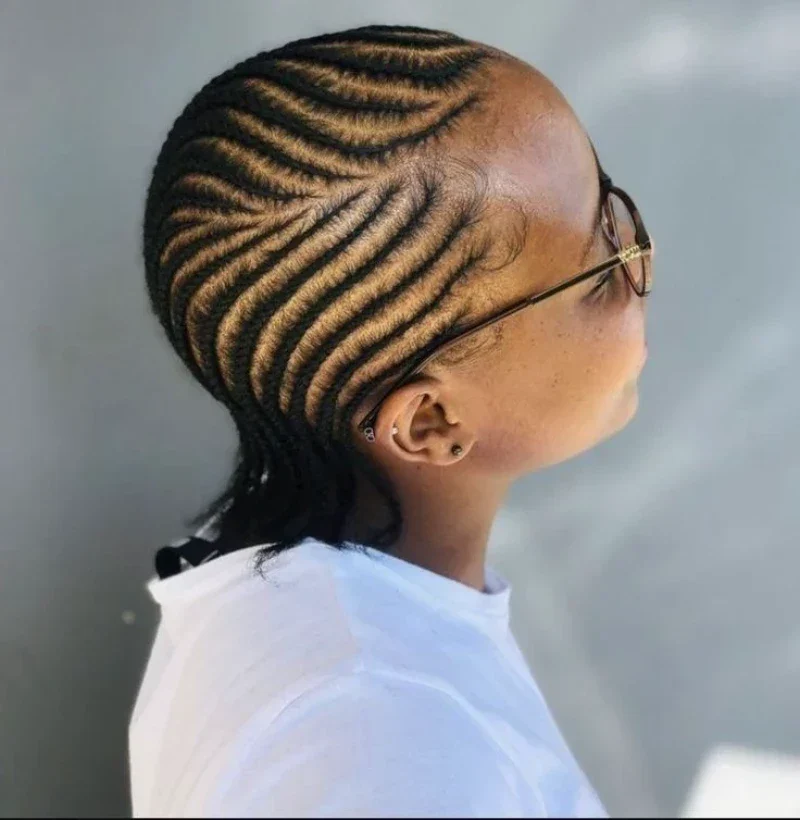
Idea 11
Swept Curves With Short Hanging Ends
Swept dark curves travel across the side toward short hanging ends behind the neck. The front remains open around the temple, with glasses visible beneath the upper braid pattern.
- Shape
- Swept curved rows
- Detail
- Short hanging ends
The lower finish is loose rather than rolled into a knot. That endpoint keeps a little movement at the back while most of the visible hair stays close to the head.
Wearability note: Choose this side view if glasses are part of your everyday look. Compare the exposed temple area and the short lower endpoint as separate preferences when discussing the reference.
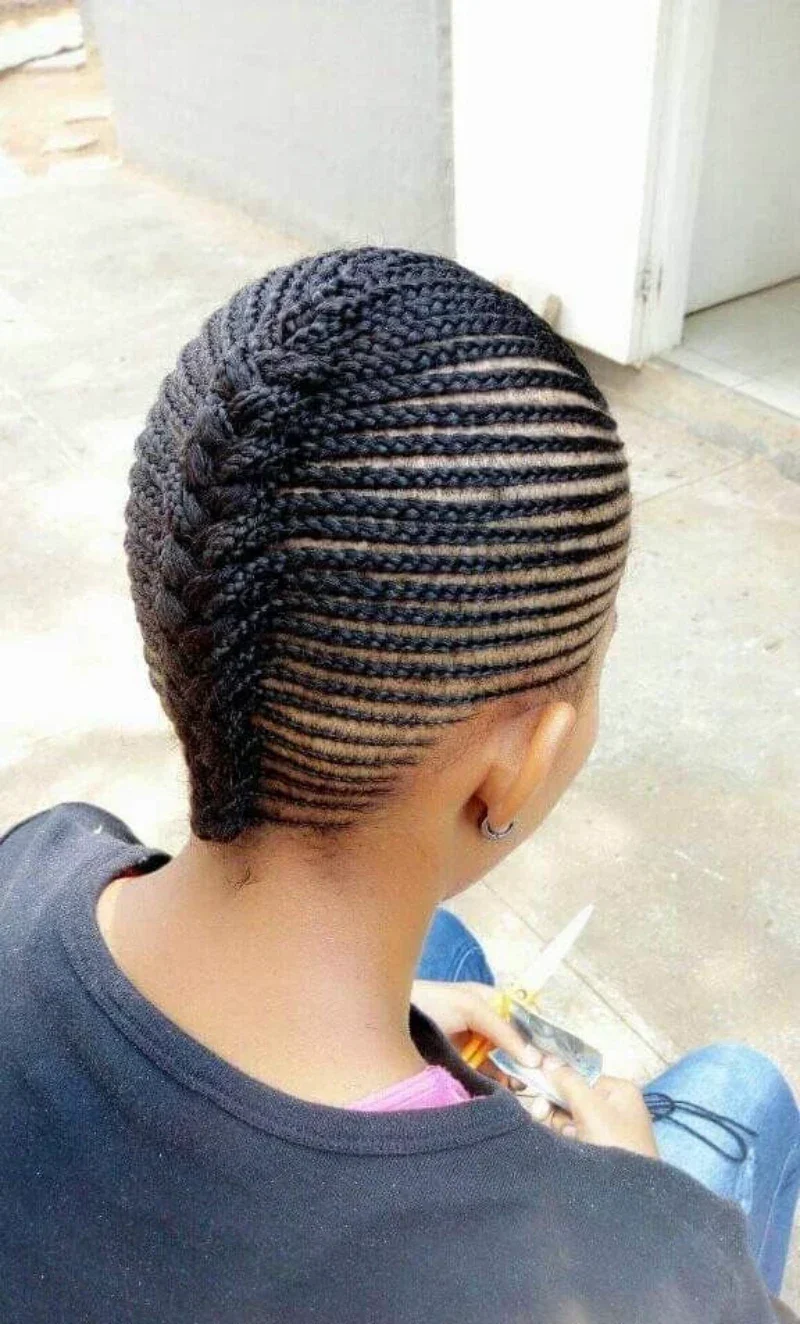
Idea 12
Broad Swept Pattern With a Compact Nape
Dark braids sweep across the upper head toward a compact nape finish. The rear-side view makes the long horizontal direction clearer than a straight-on front portrait would.
- Shape
- Broad upper sweep
- Detail
- Compact nape finish
The lower rows become shorter near the ear and neck. Their close outline contrasts with the broader rounded surface above, without a large bun adding height at the back.
Wearability note: Choose this for a contained silhouette with a strong side-to-back direction. If a raised gathering is your preference, compare another rear view rather than assuming this low endpoint can be inferred from the upper pattern alone.
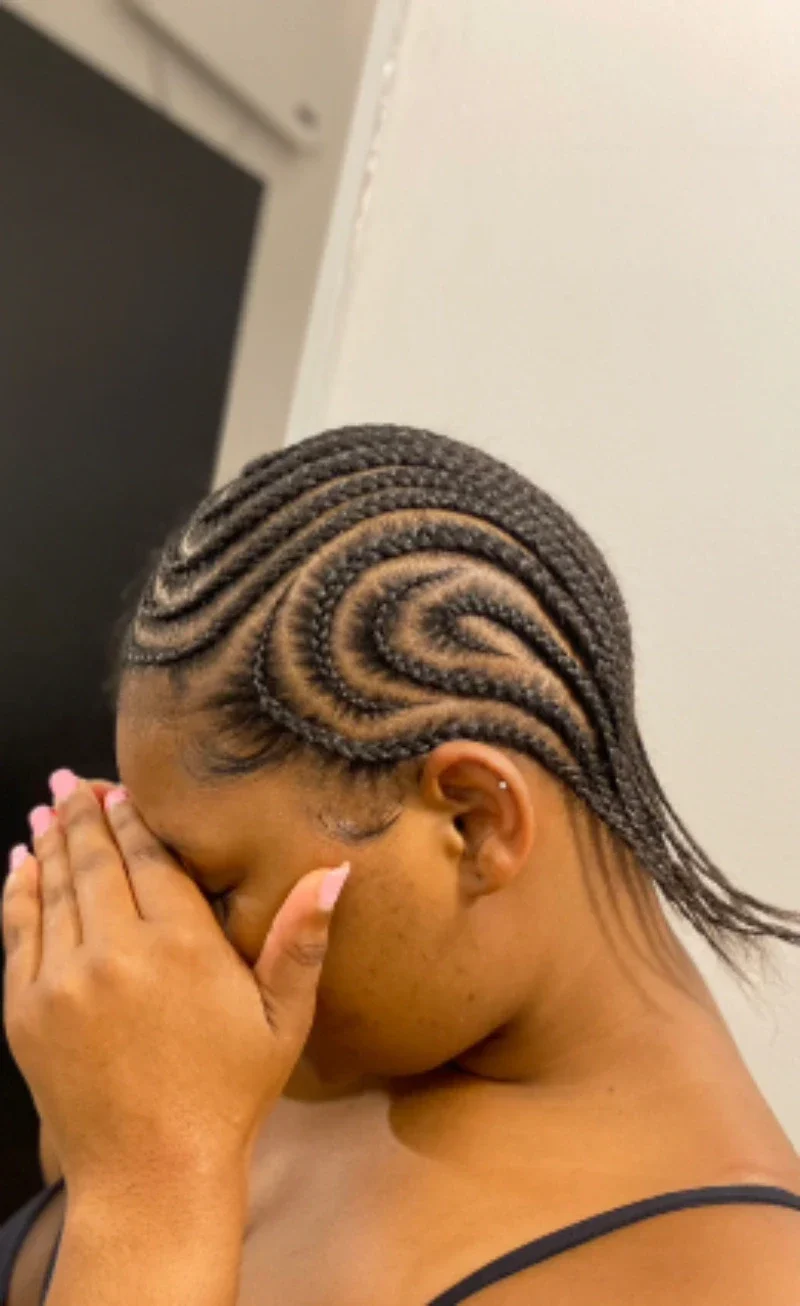
Idea 13
Small Side Swirl With Fine Back Rows
Fine dark braids curve around a small swirl above the ear. The surrounding rows sweep backward, leaving short lower ends visible behind the side of the neck.
- Shape
- Small side swirl
- Detail
- Fine rear rows
The swirl creates a compact focal point within the larger pattern. It occupies less of the side than the broader nested-curve examples, keeping the repeated rear rows more prominent.
Wearability note: Choose this if you prefer a small turn rather than a large central curve. Point out its location above the ear, because moving that focal point changes which part of the pattern is most visible from the front.
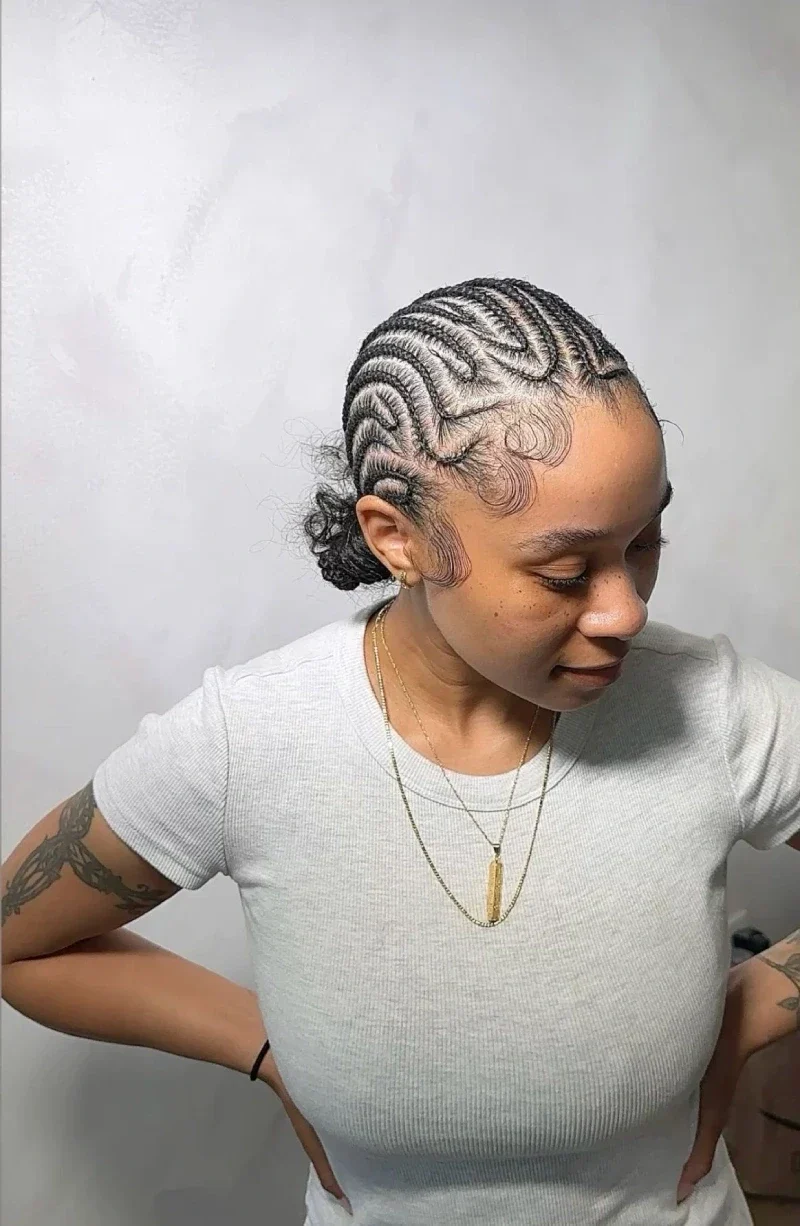
Idea 14
Flowing Side Waves With a Low Curly Bun
Flowing braid waves follow the side above a low curly bun. Fine front curls remain near the temple, while the main braided surface stays close and clearly divided.
- Shape
- Flowing side waves
- Detail
- Low curly bun
The wave pattern changes direction several times along the side. The low bun introduces a separate rounded texture at the back rather than extending those lines into long hanging plaits.
Wearability note: Choose this for the combination of a patterned side and compact curly finish. A clear profile is useful here, since the small front curls and the lower bun occupy different parts of the silhouette.
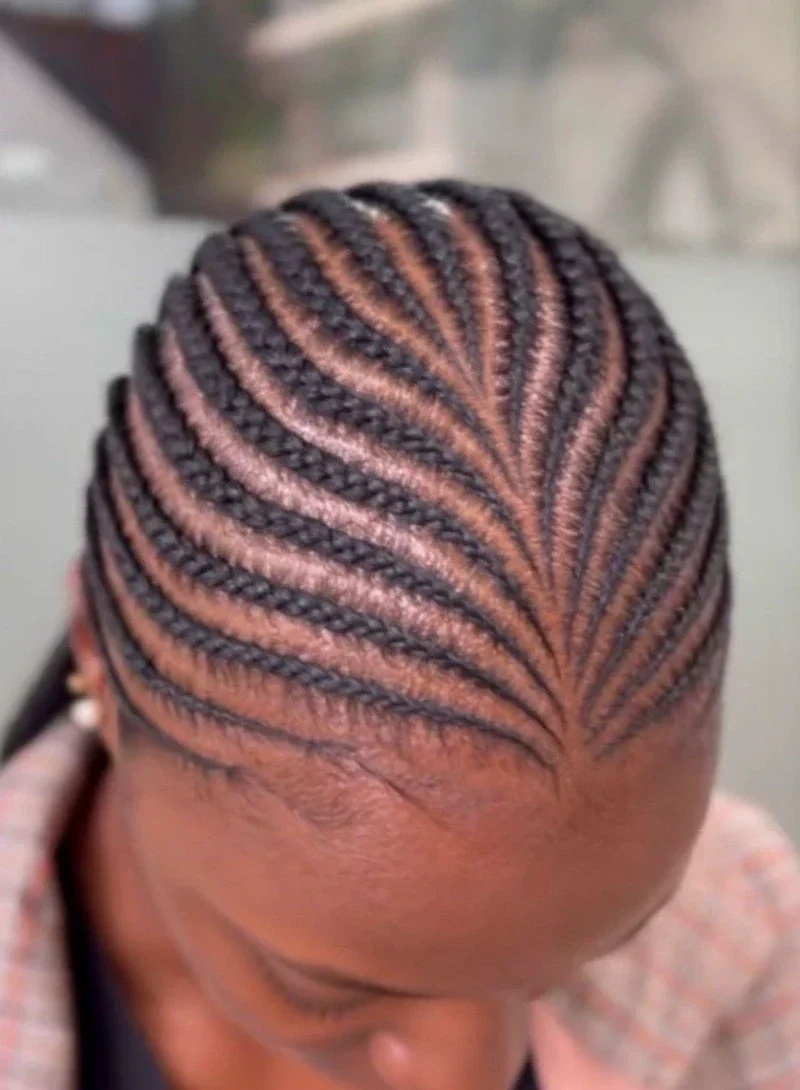
Idea 15
Fine Rows Fanning Back From the Front
Fine rows fan backward from a point near the front of the head. The overhead angle shows a repeated curved pattern spreading toward both sides, with each narrow braid remaining distinct.
- Shape
- Fine front fan
- Detail
- Close braided surface
The starting point sits slightly away from a simple straight center part. This gives the upper pattern a different direction from the evenly divided side-row example.
Wearability note: Choose this as an upper-pattern reference if that fan shape is your priority. The full back finish is not shown, so avoid treating this close view as evidence of a particular nape knot or hanging length.
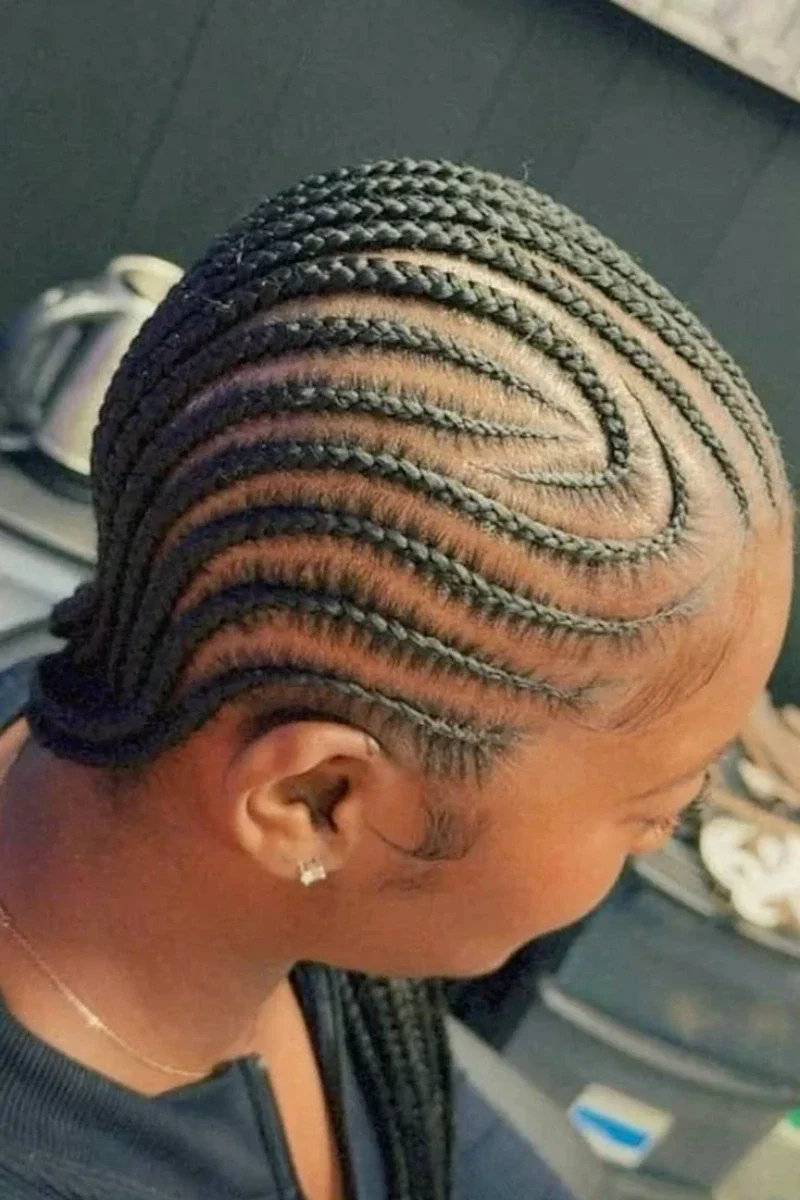
Idea 16
Rounded Side Curves With an Open Ear
Rounded dark curves travel across the side above an open ear. The rows wrap around a larger upper turn before narrowing toward the lower back.
- Shape
- Rounded side curves
- Detail
- Open ear area
The close side view makes the curved partings the main feature. A short lower finish remains visible behind the ear, while the crown stays close to the head.
Wearability note: Choose this angle if you want the side pattern clearly exposed. Compare the size of the larger turn with the smaller swirl references, rather than grouping all curved-row arrangements into one identical design.
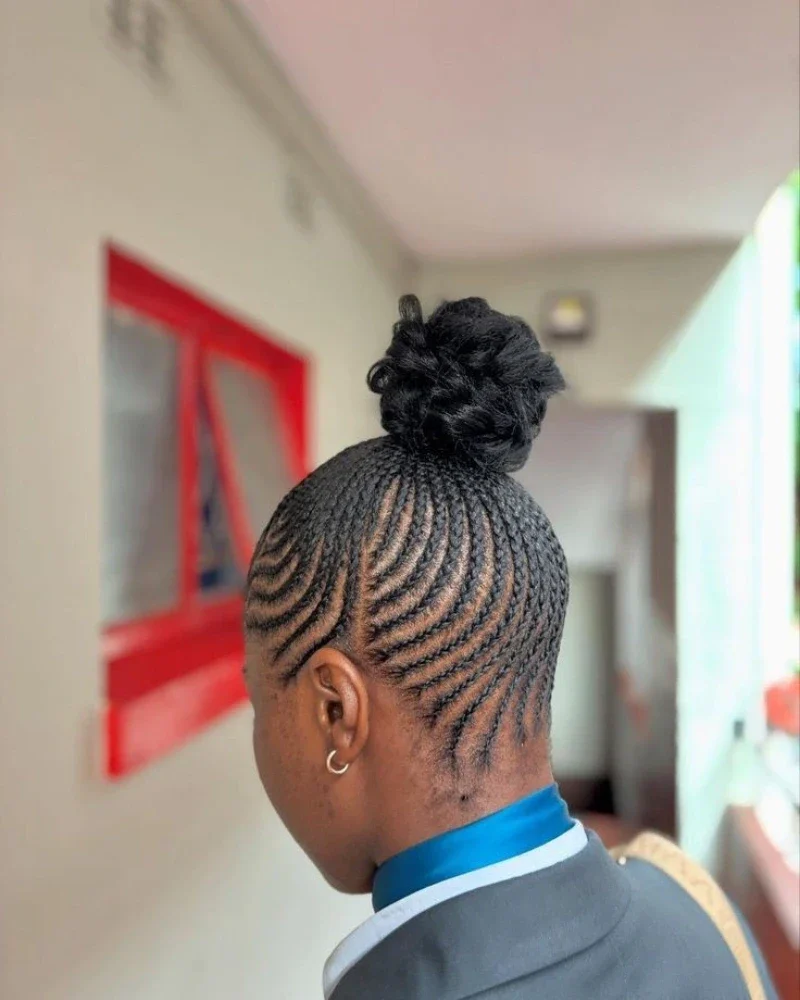
Idea 17
Upward Curves Into a High Braided Knot
Curved dark rows rise from the lower back into a high braided knot. The rear view exposes the nape and makes the upward direction of the pattern clear.
- Shape
- Upward curved rows
- Detail
- High braided knot
The knot adds a compact rounded shape above the close braided surface. The lower rows follow several shallow bends rather than a single straight vertical route.
Wearability note: Choose this if a raised endpoint and clear neck are your priorities. Compare the knot’s size with the paired-bun option, since one central gathering creates a different upper balance from two separated shapes.
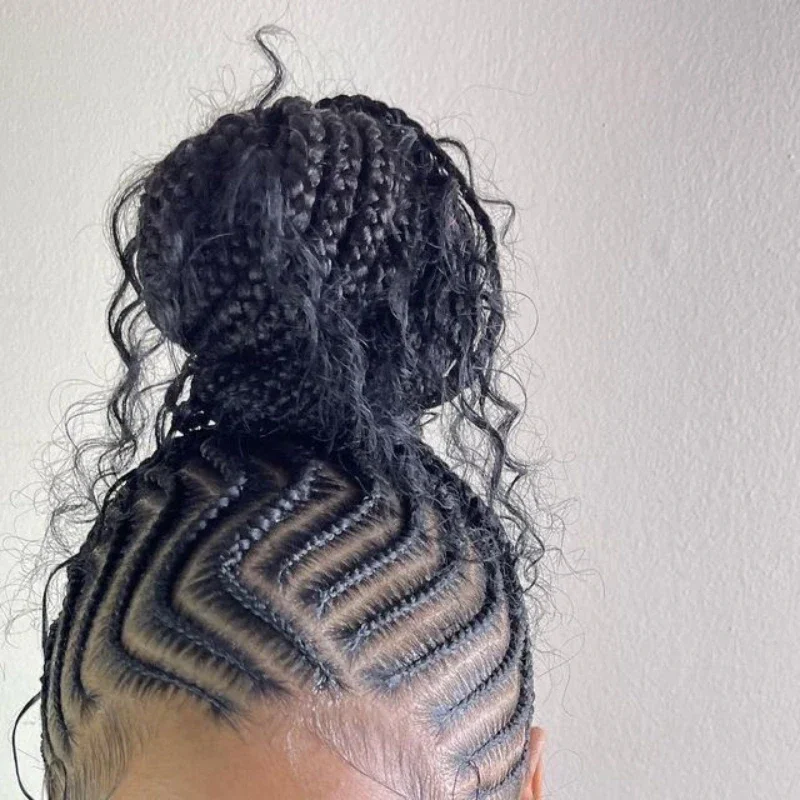
Idea 18
Chevron Front Rows Into a Loose High Bun
Chevron-shaped rows lead upward toward a loose high bun. Curled strands remain around the gathering, creating a softer top edge above the more defined front pattern.
- Shape
- Chevron front pattern
- Detail
- Loose high bun
The front partings meet at clear angles instead of rounded swirls. This gives the upper surface a sharper repeated direction, while the bun provides a separate textured focal point.
Wearability note: Choose this for the angled pattern and loose gathering together. If a fully contained bun appeals more, keep the front pattern as one reference and bring another photograph for the endpoint you prefer.
Bring more than a close crop
Save a side or rear photograph as well as the close pattern you like. The additional view shows where the rows finish and whether the result includes a bun, short loose ends or hanging length.
A visible braid pattern cannot establish comfort or materials. Keep those practical choices in the discussion alongside the design, and do not assume a source label verifies the entire installation.

About the author
Bella Ross
Bella Ross is the hairstyle editor behind Latest Easy Hairstyles. She curates practical haircut, braid, color, and styling ideas with a focus on looks that are easy to browse, realistic to recreate, and useful for everyday hair decisions.